Hi, welcome to TechWeirdo. If you are comming from SmartGoat Blog than it is it's new home btw. Anyways, in today's post I am going to show you an unique approach on how you can increase your ghost blog's speed with some Cloudflare cache settings. Also I will show you how to purge CDN cache autometically. Please give me your next 10 minutes of undivided attention and it will be worth it.
Now, I previously showed this method with a Cloudflare worker, but we don't need that anymore. Recently Cloudflare opened up their 'cookie-based-caching' for free tier and we are just going to use that. So buckle up and make your ghost blog superfast and highly scalable for free. Also this is one of the best way to setup a CDN for your self hosted Ghost Blogs.
Best Cloudflare Cache settings:
Let me first show you the settings you are going to use to setup the Cloudflare cache properly. After that I will explain why we did this.
The Cache settings to use:
Let's dive in. You are probably using Cloudflare already, but if your are not then follow this guide to add your ghost blog to Cloudflare.
Step 1: Go to Cache Settings
Open your Cloudflare dashboard. Select the domain name of your blog. Then on the left sidebar find "caching" and go to "cache rules".
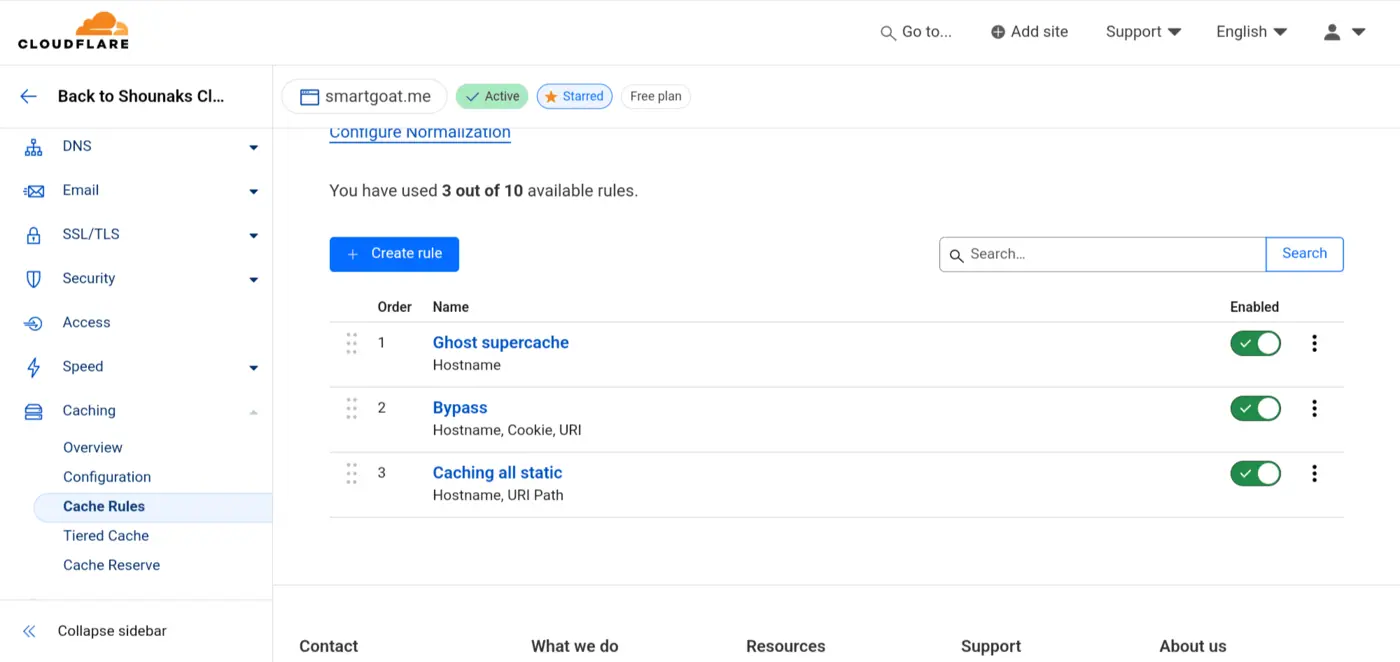
Step 2: Add these three Cache rules
Now. Before you start adding rules please remember the order of the rules is very very important. If you mess up the sequence, it won't work.
Rule 1: The Cache everything rule. Give the rule a name, then add hostname equals to ghost.smartgoat.me. Ofcourse change it to your domain. Then Cache eligibility: Eligible for cache, Edge TTL: Ignore cache control header and make it 1 year. Browser cache: Bypass.
You can also use the expression builder to add things faster. Go to edit expression and paste this code (http.host eq "ghost.smartgoat.me") . It will come in handy in the next rules.
Publish the rule.
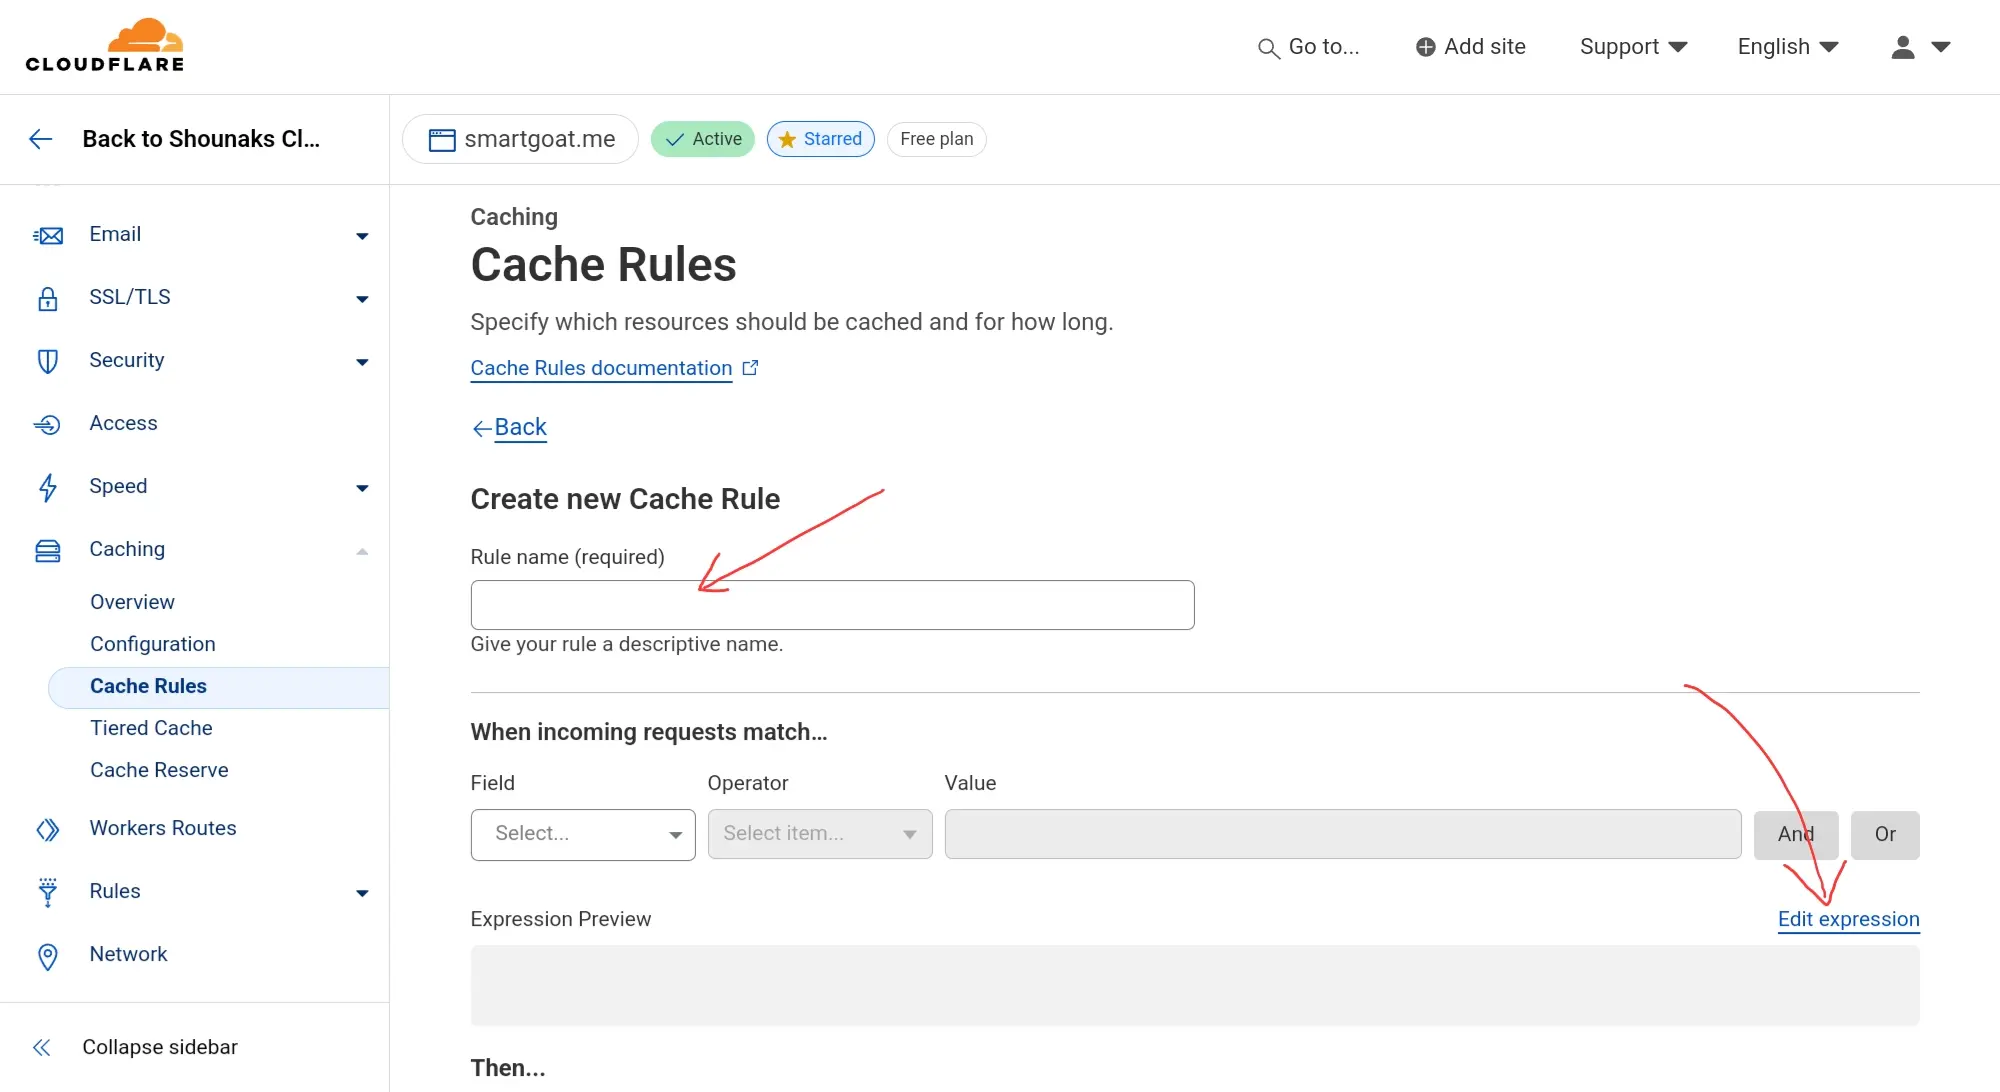
Rule 2: Bypassing cache for members, admins and preview pages. Now let me just give you the expression builder here. It will be faster and shorter. Give your rule a name then go to "edit expression".
(http.host eq "www.example.com" and http.cookie contains "ghost-members-ssr") or (http.host eq "www.example.com" and http.cookie contains "ghost-admin-api-session") or (http.request.uri contains "/ghost/") or (http.request.uri contains "/p/") or (http.request.uri contains "/member/")Copy this expression above paste it. Then click "use expression builder". You will instantly get all the rules added. Replace your blog url (please check if it is root or www) with the example domains. Set it to bypass cache and viola now the bypassing works.
Rule 3: Now if you leave it there, you will be bypassing all the static assets for your logged in visitors, which is absolutely wasteful. So let's cache all the static assets for everybody. And here is the expression builder, copy paste it. Set this rule to Edge cache ttl for 1 year. Now I don't use browser caching and keep it disabled, but you may add some browser caches too (better avoid).
(http.host eq "www.example.com" and http.request.uri.path contains "/content/") or (http.host eq "www.example.com" and http.request.uri.path contains "https://assets.techweirdo.net/assets/") or (http.host eq "www.example.com" and http.request.uri.path contains "https://assets.techweirdo.net/public/")That's it. Now you have a Ghost Blog behind the powerfull caching of Cloudflare. It is not finished yet.
Now there are some specific general settings you must change to get the best out of Cloudflare, and these settings are applicable for every sites, also necessary for this method to work properly.
- Turn off rocket loader and auto minify.
- Turn on tiered Cache, and there are many more, these two are more important.
I would highly recommend you to go through this guide to best optimize your website performance at cloudflare.
And to automatically purged the whole Cloudflare cache when you update your sites content please follow this guide.
This is the end of the guide. Now if you want to know the logic behind doing all these stuff or what real-world benefits you will get.
The context: What we are doing here?
Now that you know the process you may ask why and what are we doing here?
Ghost generates the html page for each and every visitors to your site at the server which is known as server side rendering. The process is fast and easy on the resources. But when there is a lot of traffic or a spike, things add up and stress your server. Now, server side rendering is necessary for the members to generate their personalized site, serve personalized member specific informations etc.
But most of the time, mejority of the visitors are not members(specially during a traffic spike) and generation the same html for each and every visitor is wasteful, generating it once and server it to everyone from a cache is much efficient. Now take that cache content and put that on 300+ CDN edge servers, and you get a pretty awasome setup to scale your blog.
But In CDNs, usually your static assets are cached and your html is served from your origin server. But in Cloudflare (and many other CDNs like Bunny, Fastly etc) there is a settings called "Cache everything", which also caches your html at the CDN edge servers. This massively increases your blog's loading speed and reduce load on your origin server as your content is distributed to hundreds of servers. Which are near the users and bypass your origine. But "Cache Everything" doesn't work with Ghost Blogs without some tweaks.
What is the problem? Ghost is a member focused CMS, so you have your membership enabled, and if you use "cache everything", it messes up membership settings. Shows cached contents to members, show member's private details to general users etc. It becomes a mess.
The solution? Now, let's think it like this, cache everything for everyone. But if the user is an Admin or a beloved member, then the user will bypasse the cache. Also let's cache all the static assets for everybody. And that is exactly what we are going to here. Ghost uses two cookies to identify members and admins "ghost-members-ssr" and "ghost-admin-api-session". And we have used those two cookies here.
Also, if you are not using any membership features, just use "cache everything".
Why should you do it? Well there are obvious benefits. First usually one user makes tens of request to your server per page view. If they are not members then Cloudflare CDN is going to handle all the requests, won't reach your server. But if the user is a member then only a few requests for the html and membership details will be served from your server rest will be handled from the CDN.
* I have done a 17000 page views per minute load test ( peak 1.5 Gbps) with bunny CDN, and that guide is here. But the process is same here, and Cloudflare will give you the same result. On cloudflare I have done it on a smaller scale with 8000 pageviews in a minute, serving data at 717 Mbps at peak. In both the cases load testing infrastructure was the bottleneck, not the ghost blog setup. And the origin server was a free tier VPS.
Conclusion
There you have it - by implementing these Cloudflare cache rules, your Ghost blog will be blazing fast (even during load) while still functioning membership and admin areas. Cloudflare CDN will handle the heavy lifting for most visitors, drastically reducing server load. Thus saving you big money, while making your blog highly scalable.
This guide takes a little bit of extra setup, but the payoff in performance is well worth it. So what are you waiting for? Hop into your Cloudflare dashboard and supercharge that Ghost blog today! If you get stuck or have any other questions, drop a comment below, I will be happy to help you. Thank your for reading TechWeirdo and have a nice day.

