
Hi there, welcome to TechWeirdo. In today's post, we're going to explore an interesting project, Building our own CDN. And it is easier than you think. While it's not the most practical approach for a typical blog, it should be a fun and educational exercise.
In my previous post, I tested Varnish Cache for speeding up a Ghost Blog. The results were impressive. If you're not familiar with Varnish, I'd recommend checking out that article first. Essentially, Varnish acts as a proxy, sitting in front of your blog and caching content in RAM. This means subsequent requests can be served from the cache without hitting the blog backend, essentially making your blog faster.
Now what if we setup Varnish cache on multiple servers accorss the globe, point it to the same blog origin and somehow distribute the incoming request to the nearby cache server. Well that is a basic CDN.
Interestingly, this is how many large CDNs operate. For example, services like Fastly and Catchfly use Varnish as part of their infrastructure. This got me thinking: could I use Varnish to really create my own simple CDN network? It's not exactly the same, but it's an intriguing concept to explore. So that is what I did and learned something new. you want to learn more about CDNs in general, I have another post that covers the basics.
Please Note: This is not a professional guide to setup a commercial CDN. I am just a guy on the internet and my knowledge is very limited. This is just how I did it.
Basic requirements for a CDN
Now, for a CDN, you should have multiple servers (at least two) distributed in a way to optimally cover a wide geographic area. This servers will have the ability to cache contents. Physical distance between a server and a user is very important regarding website load time.
Also you need to steer a user to the nearest server. Otherwise the whole point of having multiple cache servers fails. Also if a server goes down you need to send the users to a different server.
Thus it improves, website load time, uptime and reliability. And reduces load on the origin server.
So let's talk about how I achieved this for my Ghost Blog.
The Infrastructure
Setting up servers
For my usecase, my users are mainly distributed in 3 regions; North America, Europe and South East Asia. Also I had some free tier resources there so I setup 3 servers. Now, this servers don't need to be powerful for low traffic. I chose free tier option for testing purpose.
- For Asia: One server at Oracle Hyderabad (HYD, India). Although Singapore would be a much better choice.
- For Europe: One server at Oracle Amsterdam. This is also my origin server. A server in France or United Kingdom or Germany would have been fine too.
- For North America: One server at Google Cloud Oregon. North America is huge. For a better coverage one server each at east coast and west coast would have been ideal. But I am operating under free tier.
Steering the traffic to the nearest server and Failover.
Now, there are multiple ways of doing this. You can simply use a Global load balancer and Steering traffic to the nearest server. Or you can go with GeoDns providers ( which I used) like Gcore, ClouDns, BunnyDns etc. which will send nearby server ips based on user location.
If you have a lot of money though, you can rent you own IP address and create a anycast network with your servers too. In fact most big CDNs like Cloudflare, Fastly uses anycast network. And other big boys like Cloudfront, Akamai uses a combination of anycast and GeoDns.
Bunny DNS, Geolocation based routing, loadbalancer and auto failover
For my setup I went with Geolocation based DNS from BunnyDns, the reason is, I already pay Bunny 1 USD/ month for its CDN for my Websites, and GeoDns was included in it.
The cool thing about Bunny DNS is it not only support geolocation based traffic routing, but also constant health check and auto failover if one of your server dies. Also if you setup multiple servers in a single location you can even add routing weightage to each server and do loadbalancing. Which is cool
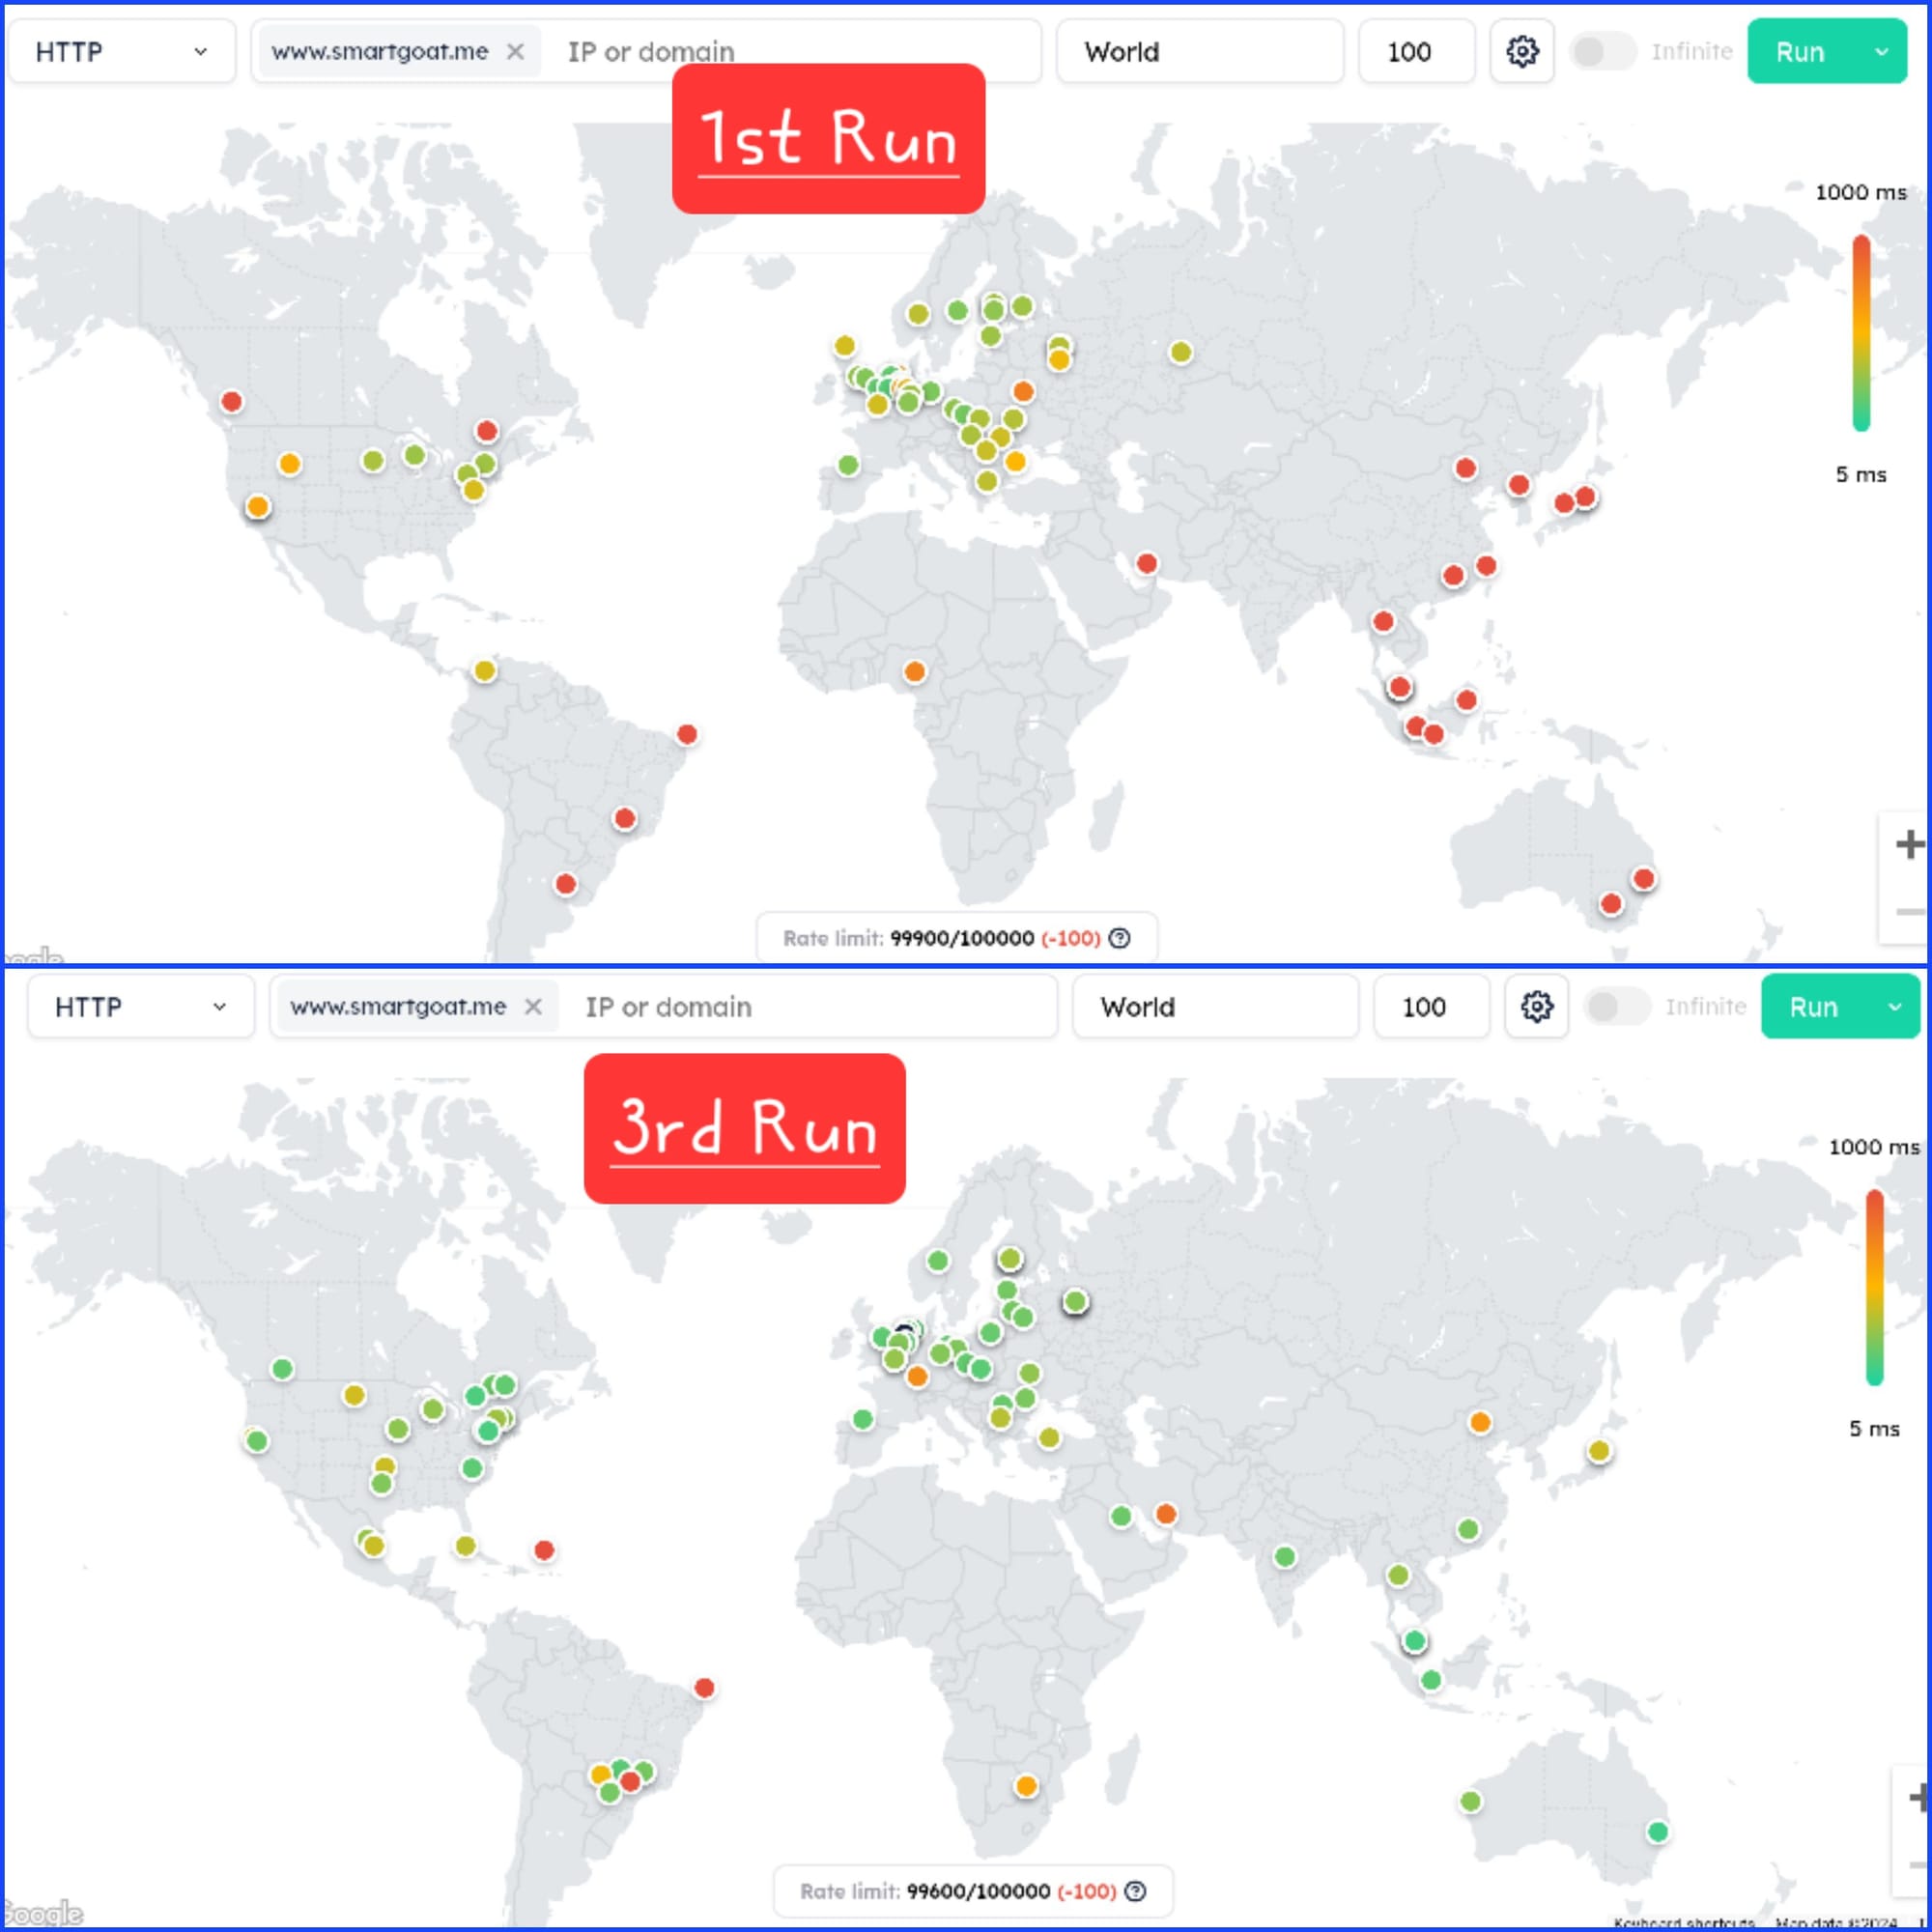
So I pointed my ip addresses and set there location on the map. And baam, traffic from us is hitting Oregon server, Asia hitting Hyderabad and Europe hitting Amsterdam. Also Australia was going to indians server. South America (brazil) to Amsterdam.
There were some cases that could have been better, for example Tel Aviv was hitting HYD but would have gotten much lower TTFB from AMS, same was true for Tokyo, which would have been faster if it was served from Oregon instead of India. But those are the little things that could be easily taken care of by choosing the right places to put your servers.
The Software part
For this I used one off the most used webserver Nginx. Which can efficiently handle large volume traffic. I was using it for SSL termination infront of Varnish. Now I know nginx can cache stuffs too. But I don't know how I can cache static files in memory with Nginx. So I went with Varnish instead.
Setting up Varnish and Nginx
So my setup is like this, my ghost blog is on a server at Amsterdam. I have 3 webservers which are installed with Nginx and Varnish. Nginx receives the incoming traffic, terminates SSL and send it to Varnish, which for the uncached contents send the request to Ghost backend, fetches the content and if it is cacheable, then store that in a in-memory cache. And for subsequent requests varnish just replies from the cache instead of going the the ghost backend.
For the Nginx and varnish configuration specially for Ghost Blogs visit this post.
Setting up the Ghost
For security reasons default installation of ghost does not open the Ghost port to all users, and restrict it to localhost only. But for this setup you need to open that up. To do that edit the config.production.json file in your Ghost Blog and edit the host from 127.0.0.1 to 0.0.0.0 and restart, but don't open the Ghost port (2368) in your VPS though. You can selectively open the port for specific Ip addresses of your server. But for me I used tailscale to create an encrypted tunnel between the servers to keep things secure.
Result
The result actually kind of surprised me. The performance of this DIY CDN was great. It could easily manage over 100-200 Pageviews per second without hurting the user experience. Which is more than half a million pageviews in a single hour ( for a ghost blog and full page cache ). Sure you can achieve much higher capacity with Cloudflare or Bunny or other CDNs but this number is not bad at all.
One thing is for sure though, it performs better than big CDNs in low traffic websites. You see big CDNs specially free ones don't cache your content for long (because cache resources is distributed among hundreds of websites. Also they have hundreds of servers so in a low traffic environment hitting a CDN server with cache already present is much more uncommon.
But in this DIY scenario, you only have 3-4 servers, and the whole server caching only your site. So chances of hitting cache increase by a lot in the scenario which actually decreases time to first byte and overall load time for users who are far away from your origin server.
Here are some maps showing the performance of my custom CDN.
Choosing the asian server at India was a bad choice. India has very bad routing. Choosing singapore would have given far better results.

As you can see the performance is pretty good at US, Europe. But not that great for southern hemisphere as I didn't put any server there. But for a almost free DIY CDN I felt good. Also remember this will be the performance even during low traffic, and Cloudflare etc won't even have the files cached in that scenario. For example in the below picture I tested a low traffic site behind cloudflare. In the third run, it gave better result than the DIY CDN, as it is cached now, but in the first run it missed cache. This is where this the DIY CDN outshines.
Cons; and why this is a bad Idea
Unfortunately the benefits of a cheap DIY CDN kind of ends here. Now sure, some professional person with actual knowledge may say otherwise, but the setup has some problems.
- Insights and analytics: You can setup analytics from nginx logs but it is not that easy.
- Managing SSL: Now in my case I just used certbot and luckily it fetched correct IP and successfully fetched the certificate in all 3 times. But that is not the way, ideally one has to setup some sort of distributed storage or certificate managers to properly manage SSL certs.\
- DDoS and Malicious traffic: Most CDNs come with included DDoS protection but this tiny DIY solution does not have any.
- You need to monitor all the servers seperately to look for usage patterns to manage unexpected traffic rise or bills etc. which is another headache.
And for all those above reasons you probably shouldn't do something like this. I was already paying Bunny for the DNS service, so I better use there CDN service instead. Also to solve that cache clearance problem some CDNs offers permanent edge storage. For example for this blog i.e TechWeirdo I use Bunny CDN permacache. Which caches my blog permanently (or till I purge cache) across 18 regions across the globe on top of its CDN. Which offers much better performance anyways.
So after this little test, without wasting much resource and increasing my carbon footprint, I shutdown my idle DIY CDN and went for a traditional CDN anyway. But the journey was fun for sure, and now I have a whole new appreciation to the complex architecture of CDNs that run the mordern internet. I hope you like this post, thanks for reading so far. If you like it, please share and subscribe free for notification, have a nice day.
